
MeetStream Guide: Create an AI Agent & Bring It Into a Meeting
What is MIA?
MIA stands for MeetStream Infrastructure Agent: the platform layer that lets you create, configure, and deploy AI agents into live meetings. Through Configure > Agents in the dashboard, you define how your agent listens, thinks, and acts during a call.
This guide walks you through creating an AI agent using MIA, connecting it to an MCP server for tool calling, and deploying it into a live meeting.
Applies to: Google Meet, Zoom, Microsoft Teams. Support: docs.meetstream.ai • API: api.meetstream.ai
1) Open the MeetStream dashboard
- Go to app.meetstream.ai.
- In the sidebar, open Configure > Agents (1).
- Click + New (2). Your agents are listed on the left, filtered by All, Pipeline and Real.
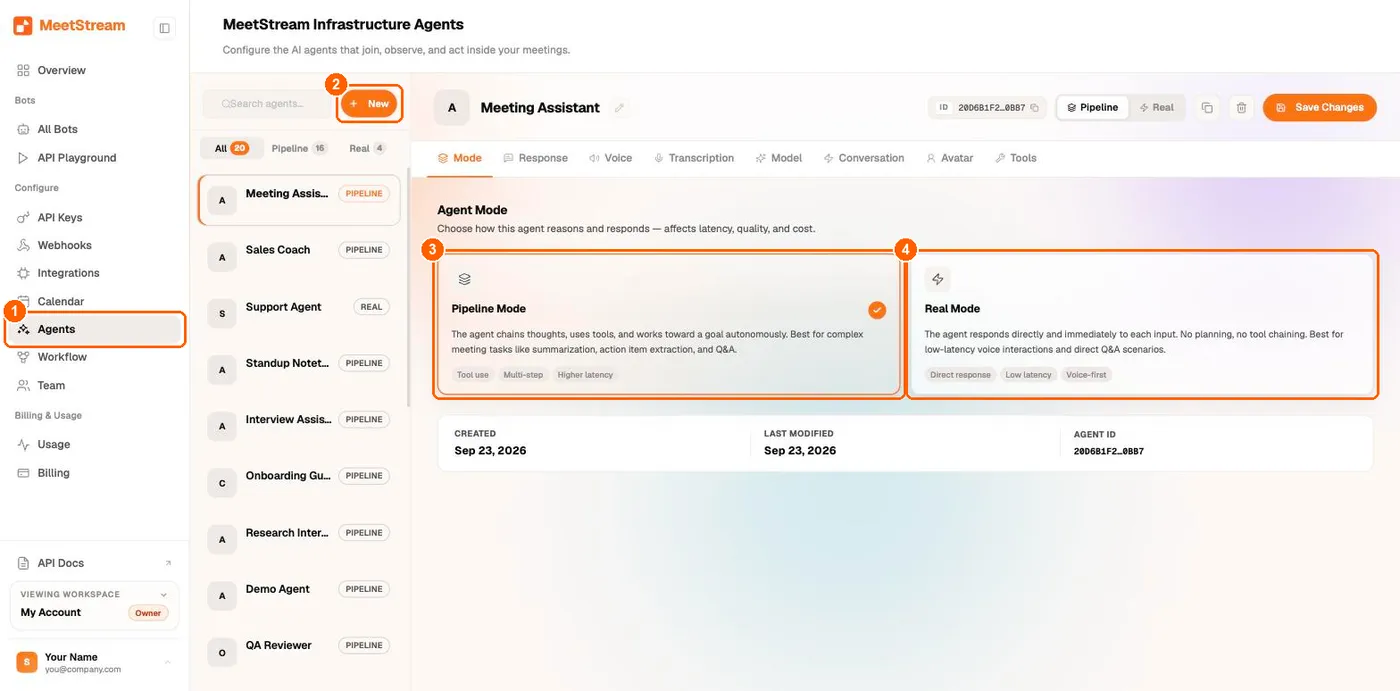
Each agent has eight settings tabs: Mode, Response, Voice, Transcription, Model, Conversation, Avatar and Tools. Click Save Changes after editing.
2) Choose a mode: Realtime vs Pipeline
MeetStream offers two agent modes, shown on the Mode tab as Real Mode (realtime) and Pipeline Mode. Pick the one that fits your use case.
Tip: Start with Real mode if you want the fastest response times. Switch to Pipeline when you need specific provider combinations, tool use or multi-step tasks.
3) Select the agent response type
Choose how the agent should interact during the meeting:
In all three modes, the agent can perform tool actions through MCP servers or custom functions (see steps 6 and 6c).
4) Select provider and model
Pick the LLM provider and model that will power your agent. The available options depend on the mode you chose in step 2:
- Real mode: select one provider and model for the entire pipeline.
- Pipeline mode: select a provider and model individually for the LLM (Model tab), the voice (Voice tab) and speech-to-text (Transcription tab).
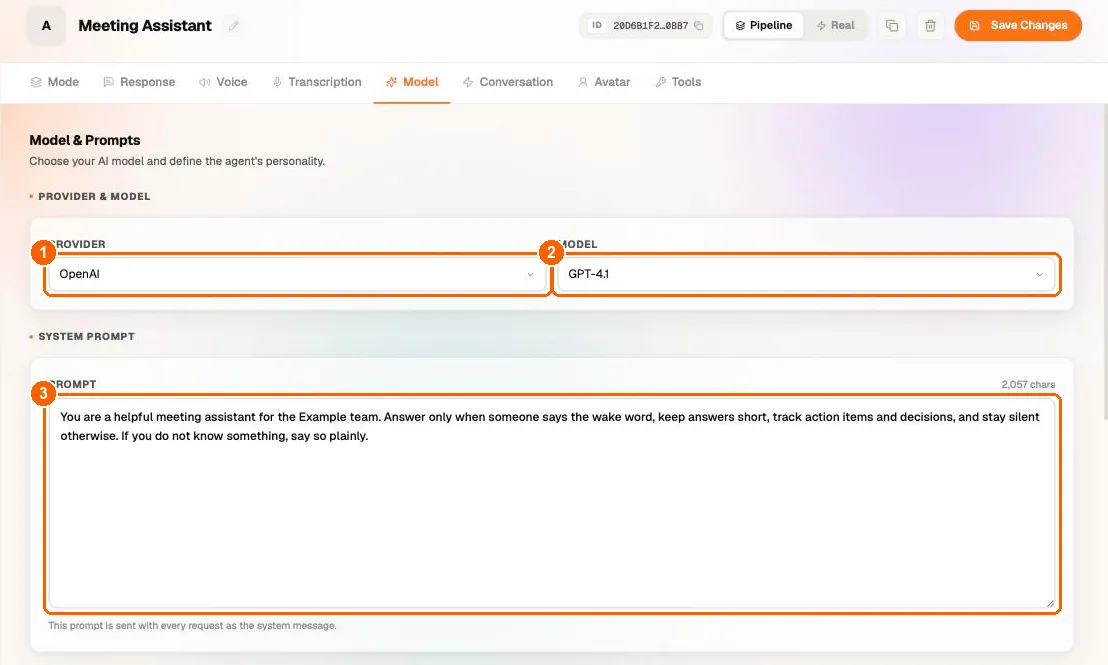
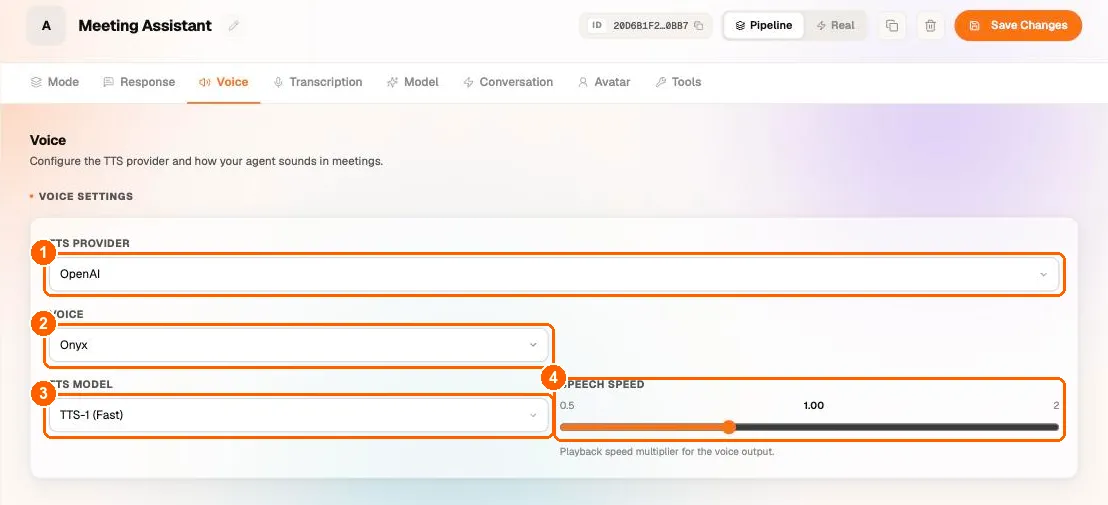
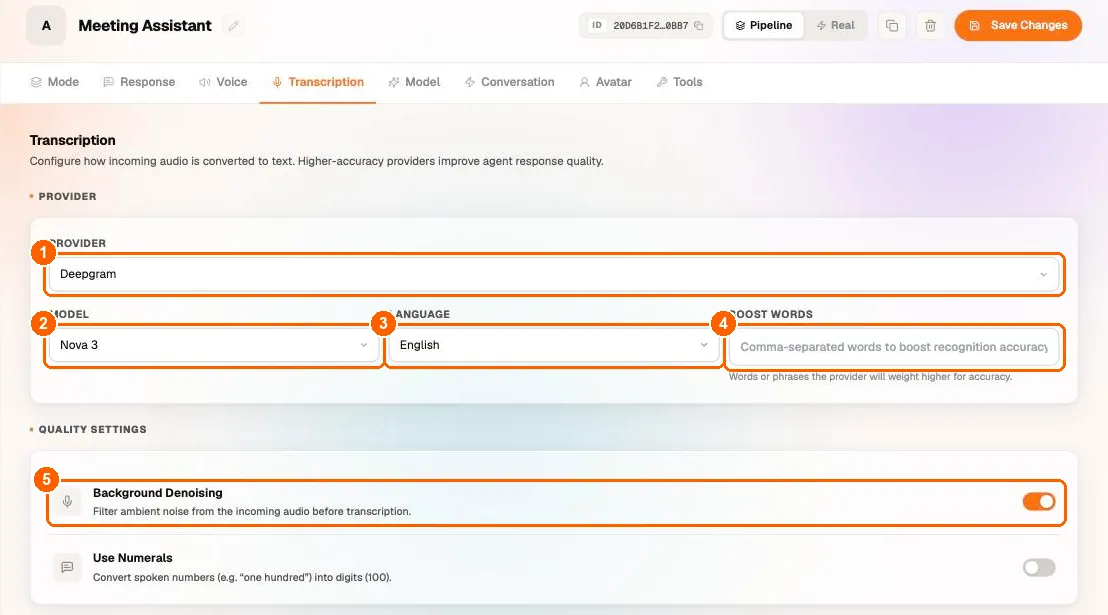
Provider API keys (for example OpenAI, xAI or ElevenLabs) are stored once under Configure > Integrations in the Models, Voice and Transcription tabs.
5) Add a system prompt
The system prompt, on the Model tab, defines how your agent behaves: its personality, constraints and instructions. It is sent with every request as the system message.
Write a clear prompt that tells the agent:
- What role it plays (e.g., “You are a meeting assistant that takes notes and creates action items”)
- What it should and shouldn’t do
- How it should respond (tone, length, format)
Example
6) Connect an MCP server (tool calling)
MCP (Model Context Protocol) lets your agent call external tools, like creating tickets, querying databases, or triggering workflows. This section shows how to set up an MCP server locally using Docker and expose it to MeetStream.
Step 1: Install Docker
- Download and install the latest Docker Desktop from docker.com.
- Sign in to Docker Desktop.
Step 2: Add an MCP server from the Docker catalog
- In Docker Desktop, look for the MCP tab (new feature).
- Go to the Catalogue section.
- Search for an MCP server: for example, Linear, GitHub, or any other available server.
- Add the server and authorize it when prompted.
Docker MCP Catalogue
Step 3: Run the MCP gateway
Start the Docker MCP gateway with streaming transport on port 8080:
Docker will start the MCP gateway locally on port 8080. You will also receive a bearer token in the output: save it, you’ll need it in step 4.
Important: Copy and store the bearer token from the command output. You will need it to authenticate MeetStream with your MCP gateway.
Step 4: Tunnel with ngrok
Your MCP gateway is running on localhost:8080, but MeetStream needs a public URL. Use ngrok to create a tunnel:
ngrok will print a public HTTPS URL like:
Your MCP endpoint is now reachable at:
For Docker MCP gateway, always append
/mcpto the ngrok URL.
Step 5: Add the MCP server URL in the dashboard
Back in the MeetStream dashboard, open the agent’s Tools tab and click Add MCP server (1). Custom HTTP functions are added from the same tab with Add function (2), up to 20 per agent.
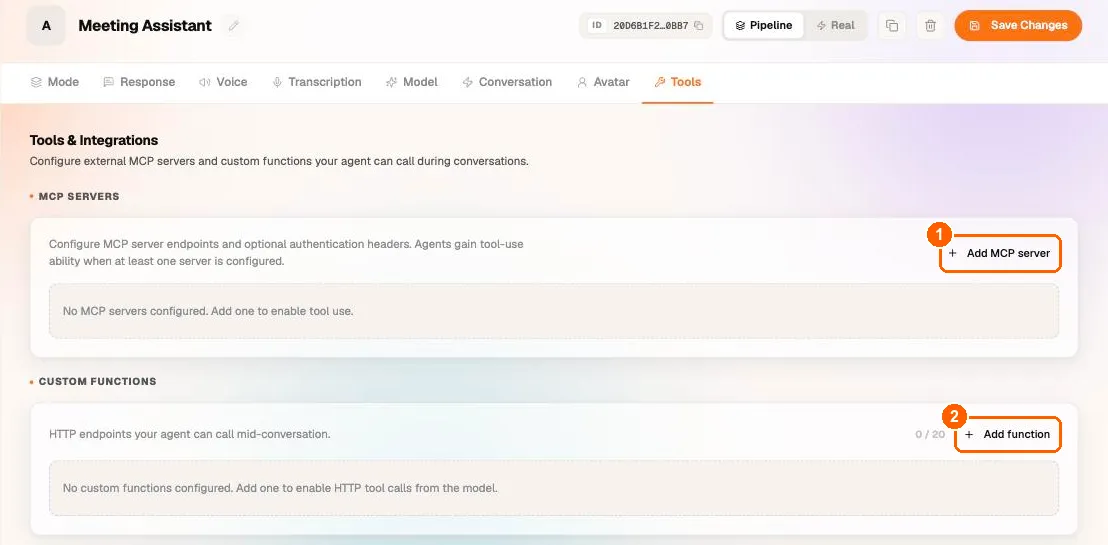
Then:
- In the MCP Server URL field, enter your full URL:
- In the Header section, add the bearer token:
- Click Fetch: MeetStream will connect to your MCP server and retrieve a list of available tools/actions.
- Select the tools you want the agent to use (e.g.,
create,list,edit, etc.). - Click Save to finalize the agent.
MCP Server Configuration
xAI Full Pipeline Agent: Quick Setup
To create an agent powered entirely by xAI (Grok STT + Grok LLM + Aurora TTS) using a single API key:
Step 1: Add your xAI API key
In the MeetStream dashboard → Integrations → add your XAI_API_KEY under the xAI integration.
This single key covers the Grok STT, Grok LLM, xAI TTS, and xAI realtime voice, so you only need to add it once.
Step 2: Create the agent via API
Parameters:
Minimum required fields (pipeline mode):
agent_name,mode,model.provider,model.model,model.system_prompt,voice.provider,voice.voice_id, andtranscriber.provider. Provider-aware defaults fillvoice.model,transcriber.model, and other optional settings. See the API Reference: Server-Side Defaults for the full defaults table.
Available xAI TTS voices:
xAI Aurora TTS also supports expressive speech tags in your LLM responses, e.g.
[pause],[laugh],<whisper>text</whisper>. See xAI speech tags docs.
Prefer lower latency? Swap the transcriber for Deepgram nova-3, which has slightly lower STT latency than xAI stt-1 for English.
6b) (Optional) Add a Virtual Avatar
Give the agent a photorealistic animated face that lip-syncs to its voice in real time. MeetStream uses Anam as the avatar provider.
Step 1: Get an Anam API key
- Sign up at anam.ai and create a project.
- Copy your API key from the Anam dashboard.
Step 2: Find an avatar id
List the avatars available on your Anam account:
Copy any id field from the response: that is your avatar_id.
Heads up: Anam has both
persona_ids andavatar_ids, both of which are UUIDs. MeetStream needs the avatar id. If you pass a persona id by mistake, MeetStream will tell you exactly that in the error message and show you how to fetch the correct id.
Step 3: Store the key in MeetStream
In the MeetStream dashboard → Integrations → Avatar → Anam, paste your ANAM_API_KEY and save.
Step 4: Enable the avatar on your agent
In Configure > Agents, open your agent, go to the Avatar tab and turn on the avatar. Paste the avatar_id from step 2.
When the bot next joins a meeting, the avatar will render on the bot’s participant tile and lip-sync to every TTS response.
6c) (Optional) Add a Custom Function
If your agent needs to call a single HTTPS endpoint you already host, e.g. a CRM lookup, an order-status API, or a webhook that creates a ticket, you can register it as a custom function directly on the agent, without running an MCP server.
The LLM sees the function’s name, description, and JSON Schema for arguments, and decides on its own when to call it. Your endpoint authenticates MeetStream the same way you’d authenticate any other client, typically a bearer token configured in the function’s headers field.
Step 1: Open the Custom Functions section
In the MIA agent editor, open the Custom Functions panel (sibling to MCP servers) and click Add Function.
Step 2: Fill in the basics
- Name: snake-case identifier, e.g.
lookup_order. Unique per agent. - Description: short natural-language description. The LLM reads this to decide when to call.
- Method:
POST(default),GET,PATCH,PUT, orDELETE. - URL: full HTTPS URL. Must resolve to a public IP; private / metadata targets are rejected.
- Headers (optional): extra HTTP headers, normally including a dedicated bearer token for your endpoint. Values can use
{{variable}}placeholders. Environment expansion works only when the whole value isenv:MY_VARand that variable is provisioned in the managed runtime.
Step 3: Define the argument schema
Paste a small JSON Schema object. Example for a weather lookup:
Step 4: Tune runtime behavior (optional)
- Timeout: 1–120 seconds (default 30).
- Retries: 0–5 on 5xx / network failures (default 2).
- Response cap: 1000–50000 characters (default 15000). Longer responses are truncated.
- Speak during execution: agent can emit a filler while the HTTP call runs. Set a custom filler (“One moment…”) or leave it blank to use the default (“One moment please.”).
- Speak after execution: turn off for pure side-effect calls (e.g. create-ticket). The agent’s turn ends silently after the call returns.
Step 5: Capture response variables (optional)
If your endpoint returns JSON, you can pull fields out of the response and use them as template variables later in the conversation:
After the tool runs, {{latest_order_status}} is available to later custom-function templates and to a saved prompt template when update_mia rebuilds it through agent_config_params. A literal system_prompt sent to update_mia is not template-resolved.
Step 6: Test and save
Save the agent. When you launch a bot with this agent, the tool is registered automatically and the LLM can call it whenever the conversation warrants.
See the Custom Functions Guide for a complete end-to-end example, including a receiving-endpoint sketch and response-variable usage.
6d) (Optional) Configure the Wake Word
Pipeline mode only. Realtime mode does not run the wake-word gate.
Pipeline agents currently start with wake-word gating enabled unless you explicitly set wake_word.enabled=false. If no block is stored, the runtime uses "hey assistant" and "hello bot" with a 30-second listening window. Configure the gate explicitly so the saved agent makes the intended behavior clear.
Step 1: Enable the gate
In the MIA agent editor, open the Wake Word panel and toggle Enabled on.
Step 2: Set the trigger phrases and timeout
Step 3 (optional): Tune for your meeting style
Two adaptive knobs let you reshape the gate without disabling it entirely:
Step 4: Test
Save the agent and launch a bot. The bot should stay quiet until you say one of the trigger phrases. Try a 1:1 call (you + bot) with Bypass below participants: 1 to confirm the bypass kicks in.
API equivalent: the same fields are accepted on
POST /api/v1/miaandPUT /api/v1/miaunderwake_word. Seewake_wordin the Agent Config API Reference for the full schema.
Step 5 (optional): Take live control during a call
The wake-word gate doesn’t have to be set in stone. While the bot is in the meeting you can flip it on/off or change the trigger phrases at runtime via the same update_mia endpoint that updates prompts:
The wake_word_enabled flag set this way supersedes the Bypass below participants rule for the rest of that call. Once you’ve taken explicit control, the platform stops auto-bypassing on participant count. This is what you want for “push-to-talk” dashboards or for a meeting host who needs to override the configured behaviour mid-call.
See Live wake-word control in the API Reference for the full contract, validation rules, and combined-update examples.
6e) (Optional) Speaker-Aware Responses
Pipeline mode only. Realtime models handle speaker context implicitly via direct audio.
By default the agent sees every transcribed utterance as coming from a single anonymous user. On multi-participant calls (sales calls, panels, group standups) the agent has no way to tell who said what, so it can’t address people by name or follow turn-taking.
Turn on speaker-aware responses and every user utterance reaching the LLM is prefixed with the active speaker’s display name:
The agent’s system prompt is automatically extended with a short note telling it to use the names but not echo the bracketed prefix back in its replies.
How to enable
In the dashboard, toggle Speaker-aware responses under the agent settings. Or via API, set agent.speaker_aware_responses: true in your POST /api/v1/mia payload:
Customising the LLM instruction (optional)
Out of the box, MeetStream appends a short generic instruction to your model.system_prompt telling the LLM to use the names but not echo the bracketed prefix back. For most agents this is enough. If you want different behaviour, for example, summarise per-speaker at the end of the call, defer authoritative weight to a host, or treat the names as silent metadata that the agent should never speak out loud, provide your own agent.speaker_aware_prompt:
Rules:
- Max 2000 characters.
- Appended verbatim to your
model.system_promptwith a leading blank line wheneverspeaker_aware_responses=true. - Omitted / empty / null → MeetStream uses its default instruction.
- The bracketed prefix on user messages (
[Rahul]: ...) is unconditional once the flag is on; the prompt only governs how the LLM interprets it, not whether it appears.
See Speaker-Aware Responses → Customising the instruction in the API Reference for more example prompts.
Speaker accuracy
The name prefix uses the latest speaker state when an utterance completes, rather than speaker-bound diarization. Treat it as conversational context; rapid hand-offs and overlapping speech can be misattributed.
API equivalent:
agent.speaker_aware_responsesonPOST /api/v1/miaandPUT /api/v1/mia. See Speaker-Aware Responses in the API Reference for full details.
7) Bring the agent into a meeting
Now that your agent is created, you can deploy it into a live meeting using the API.
API endpoint
Required fields
Include agent_config_id in your payload alongside the standard bot parameters:
When
agent_config_idis present, MeetStream auto-populates the internal WebSocket endpoints (socket_connection_urlandlive_audio_required) that bridge the bot to your agent. You do not need to supply them.
Example cURL
Once the bot joins the meeting, your AI agent is live and you can start talking to it immediately.
8) End-to-end summary
Here’s the full flow at a glance:
- Dashboard → Configure > Agents → + New
- Mode → Realtime (fast, single provider) or Pipeline (flexible, multi-provider)
- Response type → Voice / Chat / Action
- Provider & model → Pick the LLM (and TTS/STT if Pipeline)
- System prompt → Define the agent’s behavior
- MCP server → Docker MCP gateway → ngrok tunnel → add URL + bearer token → fetch & select tools
- Custom functions (optional) → Register your own HTTPS endpoints as tools with JSON Schema arguments
- Avatar (optional) → Add Anam API key → pick
avatar_id→ enable on agent - Wake word (optional, pipeline only) → Enable + set trigger phrases; for 1:1 calls set
Bypass below participants: 1 - Speaker-aware responses (optional, pipeline only) → Enable for multi-participant calls so the agent can address people by name
- Deploy →
POST /api/v1/bots/create_botwithagent_config_id - Talk → Agent is live in the meeting
Troubleshooting
MCP Fetch returns no tools
- Confirm the Docker MCP gateway is running (
docker mcp gateway run ...). - Confirm ngrok is tunneling to the correct port (8080).
- Make sure you appended
/mcpto the ngrok URL. - Verify the bearer token in the header is correct.
Agent doesn’t respond in the meeting
- Check that
agent_config_idmatches the saved agent in the dashboard. - Do not add bridge WebSocket URLs manually. When
agent_config_idis present, MeetStream suppliessocket_connection_urlandlive_audio_requiredautomatically. - Confirm that the API keys required by the configured model, voice, transcriber, and avatar providers are still valid under Integrations.
- Verify the meeting link is valid and the bot has joined successfully (check webhook events).
Avatar doesn’t appear (or session fails to start)
avatar_idis actually a persona id: Anam uses bothpersona_idandavatar_id(both UUIDs). MeetStream needs the avatar id. Fetch it fromGET https://api.anam.ai/v1/avatarsor theavatar.idfield of a persona.- Anam API key rejected (401/403): the
ANAM_API_KEYstored under Integrations was rotated or is invalid. Update it in the MeetStream dashboard. - Concurrent session limit: Anam has a per-account concurrent-session cap and no kill-session API. Orphaned sessions auto-expire at
maxSessionLengthSeconds(~180s default). The error message MeetStream returns lists the open sessions and their expiry ETA.
Custom function is never called by the LLM
- Make sure the description is clear and action-oriented. The LLM uses the description (and nothing else) to decide when to call. A vague description (“does stuff”) is the most common cause.
- Make the name specific (e.g.
lookup_orderrather thanapi_call_1). - Add an example usage in the system prompt, e.g. “When the caller asks about an order, call
lookup_orderwith the order id.”
Custom function fails with SSRF / URL-rejected error
- URLs must be HTTPS and their hostname must resolve to a public IP. Private (10.x / 172.16–31.x / 192.168.x), loopback, metadata, and link-local addresses are blocked.
- Use a proper tunnel (ngrok, Cloudflare Tunnel, etc.) during development instead of pointing at
localhost.
Custom function returns data but {{var}} is empty on update_mia
- Confirm the response is JSON (not plain text / HTML). Response-variable extraction only runs on JSON bodies.
- Confirm the
pathmatches the JSON structure exactly, dot notation only (e.g.data.user.city), no brackets or$.prefixes.
ngrok tunnel expired
- Free ngrok tunnels rotate URLs on restart. Re-run
ngrok http 8080and update the MCP Server URL in the dashboard.
For webhook event handling (bot lifecycle + post-call processing), see the Webhook Events Guide.
FAQ
What does MIA stand for?
MeetStream Infrastructure Agent. It’s the platform layer that powers agent creation, configuration, and deployment into meetings.
Can I use my own LLM API key?
Yes. MIA uses BYOK provider keys configured under Integrations in the dashboard or through the Integrations API. The providers accepted by the MIA API are listed in the Agent Config API Reference.
What’s the difference between Realtime and Pipeline mode?
Real (realtime) mode uses a single provider for LLM, TTS, STT, and MCP, so it’s faster because everything runs through one service. Pipeline lets you mix different providers for each component (e.g., one model for speech-to-text, another for the LLM), giving you more flexibility at the cost of slightly higher latency.
Can the agent perform actions in all response types (Voice, Chat, Action)?
Yes. MCP tools and custom functions work with Voice, Chat, and Action response types.
Do I need Docker to use MCP with MeetStream?
Not necessarily. Docker is one way to run an MCP server locally using the built-in MCP catalog and gateway. If you already have an MCP-compatible server hosted elsewhere, you can point MeetStream directly to its URL.
Why do I need to append /mcp to the ngrok URL?
The Docker MCP gateway exposes its MCP endpoint at the /mcp path. Without it, MeetStream won’t reach the correct route and the Fetch will fail.
Can I connect multiple MCP servers to one agent?
Yes. agent.mcp_servers is an array, so an agent can connect to multiple MCP servers. Each server can have independent headers, tool allowlists, and timeouts.
What happens if my ngrok tunnel goes down during a meeting?
The agent loses access to MCP tools while the tunnel is down. It will still be in the meeting but won’t be able to execute tool calls. Restart ngrok, update the MCP URL in the dashboard, and redeploy if needed. For production use, host your MCP server on a stable endpoint instead of a tunnel.
Where do I find my agent_config_id?
After saving your agent in the MIA dashboard, the agent_config_id is shown in the agent details. You can also retrieve it via the MeetStream API.
Can I update an agent’s configuration after creating it?
Yes. Edit the saved configuration through the dashboard or PUT /api/v1/mia; saved changes apply to new sessions. For an agent already in a meeting, use POST /api/v1/bots/{bot_id}/update_mia to update its prompt, template variables, or wake-word state live.
Which meeting platforms are supported?
Google Meet, Zoom, and Microsoft Teams.